Well actually, it ended up being smaller. But that's beside the point.
I also wanted to do something special for my mum, of course :) xx
Anyway, I wanted to have a go with royal icing, so I went down to my local cakey shop (Sugarsmiths in Newport Pagnell - if you're in the area, I suggest you have a browse) and got myself a 5 inch round tin, turntable, sidescraper and icing ruler, as well as a few other bits and bobs. I've spent too much money in that shop...
I found a fruit cake recipe online here and did my best at scaling down the recipe to fit a 5 inch tin. I went wrong somewhere as I still had enough mix left over for another cake (although not as tall as the first). I know there are websites that show methods of scaling down to fit smaller tins. I shall have to have a look at those next time.
So I ended up with two fruit cakes, one around 3 inches tall and the other around half that height.
I decided that I would use royal icing on one, and fondant on the other. I didn't want to risk the royal icing going wrong on both of them and having nothing at all for the competition. It was a good job too, as I'm terrible at it!
Well perhaps that's an overstatement, but the smaller cake (which is the one I chose to practise royal icing on) is currently still sitting on our dining table with a single wonky layer of icing on it. I really should finish it - perhaps I can recover it still. According to the video I watched to learn how to do it (here), I need to do three layers: a firm peak layer, a soft peak layer, and a runoff layer. Basically (I think) the icing is supposed to get softer the further you get. But it's a work in progress and I will update you on that at a later time.
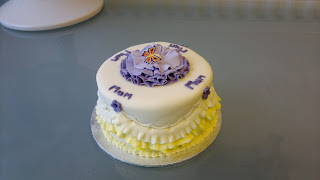
For the fondant covered cake, which ended up being my competition entry, I chose a yellow and lilac colour scheme. After covering the cake with marzipan (and kicking myself for forgetting to put apricot jam on the cake first (it was sat right there in a bowl! But I took the marzipan off and started again.) I coloured my fondant icing a pale yellow and draped it over the cake. I tried out my icing smoothing tool for the first time and was a little too vigorous with it unfortunately. I ended up with holes in my icing from air bubbles and apricot jam squeezing out (must have used too much). So I did the only thing I could think of... I put another layer of icing over the top. This one was better, smoother and without air bubbles. Thankfully I had rolled both layers out fairly thin so it didn't end up more icing than cake.
Next step (and my very favourite part) was decorating! I used methods learnt once again from Youtube, this time from a program with Elaine MacGregor. I hadn't heard of her before but the woman is a genius. You can find her videos here.
So using the methods I had learnt from these videos, I made use of crimpers, two different piping tips (I even made the piping bags myself from baking paper!), cutters and a simple cocktail stick for creating the frills. And of course my butterfly cutters came out again :-D
And here it is:
Happy Mother's Day everyone, especially my Mummy! xxx


