Monday, 5 March 2012

A Farewell (or Kane's Kit-Kat Kake!)

No... not a farewell from here. I'm never giving up, never I tell you!

Ahem, sorry.

Anyway, I must apologise for my recent absence from blogging. I've been on a diet and for the first week or so I was trying to refrain from making cakes as I have a habit of eating as I go along - which is probably why I needed to be on the diet! But I just couldn't stay away from my favourite pastime, so here is the next adventure for you to read about...

I've heard and seen a few examples of the semi famous Kit-Kat + Smarties cake, and I thought it looked fab, so I decided to give it a go. I had a perfect excuse... one of my work colleagues resigned recently and his last day was Friday, so I told him I'd bring him a cake. Since whenever I say I'll be bringing cakes to work he asks for something chocolate (brownies and chocolate log spring to mind) so I thought this would be most fitting.

It was unbelievable how many Kit-Kats this takes! I bought 13 four finger bars, and I think 11 of them got used; it was only an 8 inch cake and it took 44 Kit-Kat fingers. There were also 6 tubes of Smarties on top and I still don't think that was enough. Tell me what you think.

Chocolate sponges just out the oven.

Sandwiched with chocolate buttercream. The whole cake was then covered with chocolate buttercream as well, but I wanted to work quickly to get the Kit-Kat fingers on before the icing started to set, so I didn't get a picture :-(
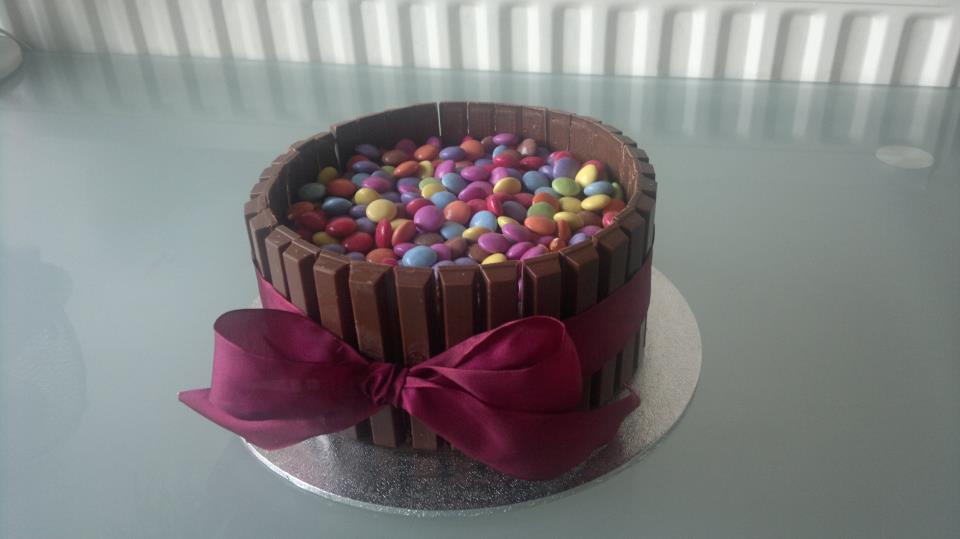
And here is the finished product! I was quite pleased with it - I was picturing some horrendous wonky mess but it turned out OK, I think.

I had to look up how to tie a proper bow, because when I tried to do it at first, it was like I'd just tied my shoe laces: not very elegant at all.

One thing that I need to remember for if I do this again... keep the Kit-Kats in the same groups of four they were in before I broke them apart, so that they fit together perfectly on the cake! It's unbelievably difficult to break a Kit-Kat evenly (while the biscuits are separated, the chocolate on them doesn't necessarily break in a straight line), so putting them next to the ones they were next to in the first place makes it like fitting two jigsaw pieces together. Seems obvious now I've written it down but it didn't seem like that at the time.

On the Friday morning, I arrived at work as I normally do before Kane (aforementioned colleague), complete with cake, which I placed on his desk as a surprise for when he arrived. He knew I was making a cake, but not what sort :-) I'd just settled down with my cup of tea, logged in and started work, when I got a phone call from the nursery. My son wasn't well and I had to go and get him. Oh well, up I got again, picked up the cake (yet to be seen by anyone, and I wanted to see his face when he saw it) and headed off.

Luckily I was able to come back in again a couple of hours later, and could give Kane his cake. He seemed very pleased with it, carrying it carefully round the building to show everybody. I just hovered behind him sheepishly as a lot of people exclaimed over it. It attracted a lot of attention. :-)

The most important thing of all... it all got eaten within minutes of being cut, so I heard. I managed to pinch a couple of slices to take home with me, but by the time I got to them they were stale. 

Oh well. At least I get the satisfaction of a job well done.

PS. Amazingly, I have stuck to the diet and have refrained from eating any of the left over Kit-Kat fingers in the fridge. My 19 month old son gets that privilege :-)

Saturday, 18 February 2012

Chocolate cupcake

I've been practising my piping skills this week... I like to think I'm getting better:


Friday, 17 February 2012

Valentine's Day

I made a cake for Valentine's Day. What self-respecting cakey type person would let a day like that pass without... well, cake. I decided to go for something slightly different from my usual, and tried out a Mary Berry recipe that my mum wrote down for me.

I tested out my new heart shaped tins. The recipe was a standard 4, 4, 4, 2 mix with added cocoa powder, but I think I should have gone for the 6, 6, 6, 3 option as, while the cakes rose, they didn't finish particularly thick. But once they were sandwiched together (with chocolate buttercream) the resulting height wasn't too bad.

The icing used to cover it was one I've never done before - I melted butter and cocoa powder over a low heat, added... milk (I think!!) and then icing sugar, and ended up with something I could pour over the cake which then set very quickly. If anyone knows what this kind of icing is called, feel free to enlighten me :-)

So once this was poured over the cake and spread out relatively easily, I wiped down the cake board (it got a bit messy) and was then left with a cake that had a beautiful smooth finish on top, but not so nice around the sides. So I needed to cover the sides, and I had very few ideas. One was to use chocolate fingers, but that would have meant going to the shop, and I've already covered the subject of my laziness (and I'm not going to tell you again because I'm too lazy!) So I got out my laptop and started surfing for inspiration. I found it in the form of ribbons. I'd never made an icing bow before, and I'd seen various tutorials on the subject, so I thought I'd give it a go.

I forgot to add that I'd spent the previous afternoon making slightly more than a dozen fondant roses, which is alarmingly time consuming. And I don't have any calyx cutters, so that presented another problem. I had to try and be clever with fondant leaves instead.

So this is what I ended up with (didn't taste too bad either):

 Bit wonky, never mind...


I entered it into a competition but it didn't even get shortlisted... maybe next time.

Saturday, 4 February 2012

An Elegant Disaster

So this week I decided to practise fondant modelling and methods again. I'd purchased some new kit I was keen to try out, including butterfly plunger cutters from TK Maxx (it would seem this shop is an absolute gold mine for low cost cake stuff! You have to look hard though - it's not exactly stacked neatly or by product on the shelves, it's all higgledy piggledy. I guess it provokes impulse buying.) and something I can't remember the name of right now but it is a gum tragacanth substitute. From some of the millions of online videos I've watched on the subject, gum trag makes fondant easier to work with and helps it set stronger, making it good for fondant roses with their thin edges.

I also bought some rejuvenator spirit, which it turns out I didn't need, but I'll get to that.

I considered trying out a new cupcake recipe, but two things prevented this: one being that I didn't have the right ingredients in the cupboard for anything other than vanilla and the other was that I couldn't be bothered to go to the shop. I know, I'm so lazy. It's about a 5 minute walk from my house. My baby was napping, that's my excuse and I'm sticking to it.

Anyway, vanilla cupcakes it was. I've made them before with the recipe I used (from the Primrose Bakery Cupcakes book) but I hadn't really had the chance to try them (this was the fondant family cupcakes - they were all scoffed at the party, I took that as a sign that they were good). I only made 12, so I didn't want to try one before I decorated them as that would mean I was only left with 11. You'd assume that if you follow a recipe in a book by professionals to the letter, they will turn out OK, right? It seems logical to me. Anyway, not trying one was something of a mistake.

I wasn't entirely sure what I was going to do with the cupcakes until I actually sat down with all my gear, which fills a very large box now and is already overflowing into old chocolate tins and other useful pots. I picked out the butterfly cutters and spotted the red Sugarflair paste colour I had bought, which inspired me to practise my roses again; I haven't done any for a while. This colouring made me realise that the ones I already have aren't paste after all, but more of a thick liquid. I had never seen a proper paste colour before so assumed that the ones from Hobbycraft were, but apparently not. They do the job though.

I hand painted the butterflies, which is something I've always wanted to try. I bought the rejuvenator spirit for this purpose, although it seems to be just for powdered colours rather than paste or liquid colours, as when I tried to add it to the colours, it just turned to an odd, sticky consistency; not paintable at all. I then discovered that mixing the colours with water does just as good a job.

I also put my flower cutters to good use again:


Trying to be a bit snazzy with my photography... did it work? :)


So there they were, 12 cakes I had put several hours and a lot of hard work into. I was even quite proud of how they looked. Then we tasted them.

The sponge was thick and stodgy, heavy enough to sink ships! OK, not really. But my mum didn't even finish hers, and neither did Art. They were worse than the lemon cupcakes (also from the same book, see my previous blog entry). I took them to work and offered them to everyone with the warning that they were not exactly light and fluffy, some complimented (one colleague said it was like a scone with icing on, but tasty all the same), others kept quiet... but they all got eaten either way.

A lot of people have suggested that I didn't get enough air into the mixture, but as I have said I followed the recipe exactly. It calls for several minutes (not joking) of beating with an electric hand mixer after every step, which I did. My arm was aching by the end. It even asks to do this after adding the flour, which (after several discussions with people who know what they are doing when it comes to cakes, and also coming from my own common sense) actually knocks air out of the mixture, surely?

It was also suggested that the recipe ingredients are out of balance, and I think this is closer to the mark. It calls for only 110g of butter but nearly 300g of flour. I'm used to a sponge being an equal mixture of butter, flour and sugar, but this one definitely isn't. There is also a lot of milk going into the mix, 120ml I think.

I've looked at the reviews on Amazon for the book and, while it has a lot of good reviews, all those that are less favourable say the same things I have said above - that their cakes came out hard, stodgy and often completely inedible. 

I don't think I'll be using that book again.

Tuesday, 24 January 2012

New Flavours

I've tried out two new things since I last blogged: lemon and coffee cake.

The lemon was in the form of cupcakes and used a recipe from my Primrose Bakery cupcakes book. Both lemon juice and zest gave a really lemony flavour, and for some reason the recipe called for sour cream. I really don't know what that was for, but I used it anyway, and now I have a nearly-full pot of soured cream in my fridge that I don't know what to do with! I suppose I could make more lemon cakes :-)

They tasted great, although seemed a little stodgy to me. I'm not sure if that's just how the recipe is meant to turn out or if I did something wrong. I beat the mixture for ages so there was plenty of air in it. What comes to mind is the fact that, in my efforts to put the same amount of mixture in each case, I used a large measuring spoon (a 1/4 cup I think, or maybe smaller) to portion out the mixture. Perhaps I knocked the air out of them then. Or perhaps it wasn't a lack of air at all, as they rose very well. Oh well, I'm sure I'll find out somewhere along the line.

I used the book's lemon buttercream recipe too; very zingy! The icing on its own was slightly unpleasant (I have a terrible habit of licking icing off of the tops of cakes, very uncouth I know) but paired with the cake, the sweetness of the sponge and the tartness of the icing made a very good couple.

A recent trip to Hobbycraft saw me buying a set of three flower plunger cutters, so I put these to good use decorating the cupcakes:

These were the first six I decorated - I had to go out and take my son to his Nanny's (the grandparent kind, not the childcare kind... or goat for that matter), so I popped these in a box to take round there for her, planning to finish the rest when I got home. But then disaster struck as I was on my way out the door and the cakes ended up in a pile on the rug. There was icing all over the floor and, needless to say, I was very upset. But, there were plenty of cakes left, so as fast as I could, I prepared another six:

These didn't look so good, but as it turned out it didn't matter. When we got there, there was nobody home!

So we came home again, and I cut out some more flowers and finished the rest.


So that was the lemon cupcake fiasco.

As for the coffee cake, that has gone slightly better. It's a birthday cake for my boyfriend, and there are only two things he drinks; coffee and beer. I thought a beer flavoured cake might be a bit gross, so I went for coffee. It's decorated with coffee flavour buttercream icing (putting my new palette knife to good use as well), melted chocolate mixed with a little icing sugar to help it keep shape while I piped it, and of course the words 'Happy Birthday' piped on. Piping the lettering brought today's little disaster... I made the icing too thin, so the words just spread out so they were unreadable. So I wrote it again on the top of the spread out words, in icing that was meant to be black but ended up grey, and started off too thick to pipe (my piping bag burst and I had to switch to the syringe) and ended up slightly too runny when I added water to it. But thankfully not as runny as the first attempt, so it ended up readable.

Anyway...


Happy Birthday Babe!

Sunday, 15 January 2012

Birthday Cupcakes

I made some birthday cupcakes as a surprise for my cousin this week. The theme I chose (mainly because I wanted to practise doing fondant figures) was to create a cake for each member of the family, with a little model of each person or pet on each cake.

The cake recipe I used was intially a basic vanilla, but to make them more interesting I spooned half the mixture into the cases, then added a tablespoon of cocoa power to the remaining mixture along with a little milk to keep the consistency right. This chocolate mixture was then added to the cases and mixed very gently to create a marbled effect. I was a little nervous doing this as I know how easy it is to upset the delicate balance of ingredients in a cake - you can't really improvise like with other recipes; making amendments to the ingredients just to see if it improves the taste; as you can end up with just a sunken mess in your cake pan - but it turned out well. They rose brilliantly, and what I ended up with was this:


I ended up having to cut the tops off in order to ice them, although given how domed cupcakes generally end up I guess I'd have had to do that anyway.

I didn't use any kind of mould for the figures - I know a lot of people use them for faces but I didn't have one, and I'm not sure I would want to use one anyway. I think it would depend on who I was making it for and what was expected.

The figures are completely edible, all made with icing with their heads fitted to the bodies with candy sticks. The fine detail is drawn onto the faces with an edible food pen.


I did little additions to reflect the person - this one is keen on growing his own veg!

This is my cousin the birthday girl.


Got to include the pets!


The family on their cakes (pink vanilla buttercream for the girls and blue for the boys!) all boxed up and ready to go. There were two cakes left over so I just covered these with the leftover icing and sugar decorations. The larger cake tops were sandwiched together with the rest of the icing - waste not want not!


I've been to Hobbycraft today and bought two new heart-shaped tins in preparation for Valentine's Day... watch this space!

Monday, 9 January 2012

Christmassy Goodness

I baked our 2011 Christmas cake back in early November. Probably not as early as it should have been, but not last-minute at least. It was a fruit cake, fed with brandy once a week until it was time to decorate!

I kept the decorating fairly simple - since it was my first Christmas cake I didn't want to try anything new for fear of messing it up completely - so it was covered with marzipan and fondant icing, and fondant decorations/writing. I didn't have any alphabet stamps, so I had to cut out the letters with a knife.


I had also intended to make a single, large gingerbread house. I found a recipe I wanted to use here (recommended for lovely soft gingerbread with a delicious spicy flavour), but was completely confused by the template (because our printer wasn't working at the time, I couldn't print the template, so I tried drawing it. But without measurements, I wasn't able to get it to the right dimensions.) I decided to improvise, using the same recipe for the gingerbread but cutting out several different shapes with pastry cutters. Once baked, I was able to use the shapes to assemble three smaller houses:

I also used the Christmas tree shaped cookie cutter to create a festive tree, and added a snowman to complete the picture.

The decorations are just jelly sweets and glacè icing.

I also sprinkled icing sugar over everything for snow.


Also, from earlier in December, were these:
Another go at practising piping buttercream icing, coloured a strong shade of blue with the colour paste. I was quite pleased with the effect I was able to achieve on the final two cakes in the picture.


I've been given 'The Home Guide to Cake Decorating' by Jane Price for Christmas (courtesy of the other Arf), as well as a guide to making fondant animals and a book of loads of cupcake recipes, so expect more to come soon!

What I want to try next:

Fondant animals.
New cupcake and buttercream recipes.