Wednesday, 26 December 2012

Christmas Cake

So I finally finished it - at about lunchtime on Christmas Eve mind, but I finished it :-)

So, here we have an 8 inch square fruit cake (made with Delia's recipe) covered in marzipan and sugar paste. I managed to cover the cake and board together without ripping the icing, which I always feel is the hardest part as it's the most difficult thing to fix. It was a little bit lumpy, but I think once the decorations were added then the lumpy bits were less obvious.

I cut out some stars and sprayed them with silver lustre, cut out some holly leaves and modelled some berries and a little penguin which people tell me looks like a famous children's TV penguin, but that wasn't deliberate. The image must just be etched in my brain :-)

I also added some snowballs just to fill in the gap.


A vast improvement on last year's effort, I think :-)

In case you forgot...


Sunday, 23 December 2012

Christmas cake is coming

Christmas cake is on its way... it has been marzipanned and iced. Now all I need is some inspiration for the actual decorating. Hmmm.


Oh, the potential...

Friday, 14 December 2012

The Latest Baking Practice

Just a few of the latest creations from my baking practice:

Chequerboard biscuits: These were fun to make but didn't taste very good. Might be because I ran out of plain flour and tried replacing it with the only vaguely suitable thing I could find - brown rice flour. Didn't work...

Jamaican ginger cake made with stem ginger. That's lemon icing drizzled over the top. Yes, I know what it looks like.

Well, you've got to make mince pies this time of year haven't you? Unfortunately I over filled them and they exploded. That stuff sets like concrete so I couldn't get them out of the tray! I made the shortcrust pastry myself though. 


I rather fancied some chocolate so I threw these together in a hurry ;) The cake is Rachel Allen's chocolate cupcake recipe and the icing is the Primrose Bakery's chocolate buttercream. I used Co-Op's Fairtrade Ghanaian 84% cocoa solids chocolate for the buttercream - it was lush!

Monday, 19 November 2012

Battenberg!

I've decided that I need to concentrate more on baking methods for a while, rather than just decorating. Plus after the wedding cake experience I'm all decorated out, so to speak. For a little while anyway.

So I've been on Amazon and bought myself a little pressie - Rachel Allen's Cake, and gave her Battenburg recipe a go. It surprised me in that the cake itself was just a basic Victoria sponge recipe; it was the method that was the tricky part. I had to separate the batter into two batches so one could be coloured pink (harder than it sounds - I had to try and stir the colour in thoroughly without knocking all the air out of the mixture.)

The batter then had to be put into a square 20cm cake tin which had a folded parchment separator in the middle to give it two compartments and therefore produce two rectangular cakes, one of each colour. Trying to get the first lot of batter in without the paper collapsing was the tricky bit! Once the second lot was in, each side kind of held it up so the only trouble was making sure it stayed in the middle.

Whilst baking, the paper did seem to drift off to one side, so I ended up with one wide short cake and one narrow tall cake! But with a bit of trimming, I was able to fix this.

Half a jar of apricot jam and far too much marzipan later, this was the result:

Not bad for a first attempt, I like to think!

Monday, 24 September 2012

Wedding Cake - Cascading Roses

So here it finally is, my first ever wedding cake!


I decided to go for the cascading roses style, as that is quite popular at the moment; and it was quite handy as the decorating theme for the reception was roses too, as you can see from the table! I had already known the colour scheme was red, but I hadn't known about the roses theme, so it was quite lucky really. :-)

I originally made the (49!!) roses on cocktail sticks, with the intention of using them to stick them to, or rather in, the cake. But because there ended up being so many of them I felt uncomfortable with the idea of so many cocktail sticks being stuck in there; it seemed a bit unprofessional; so I took them off the cocktail sticks and stuck them on with royal icing instead. I was terrified that they wouldn't stay stuck and would fall off during transport, but the cake was well packaged in a box bought from www.craftcompany.co.uk (expensive for a box, but well worth the money), so they were all OK and the cake made it to the reception in one piece!

I was especially proud of the fact that I manage to cover all three cakes with icing on the first attempt without any tears or folds, and on the bottom tier I managed to cover both the cake and the board in one go! Yay me! :)

Here is a close up for you:


I have to say I thought I'd lost interest in cake decorating, until I made this cake and heard the reactions of all the people who were impressed by it. I know there are much better cakes out there, but I can't help but feel a little warm glow when I look at this one.

PS. Apparently it was delicious too.

Saturday, 22 September 2012

Wedding cake

So I finished the wedding cake, after a week off work and several moments of panicky 'I can't do this!!'

The wedding is today so I won't be showing any pictures until later ;-) but I can tell you I made nearly 50 roses in the end! I ended up buying a 5 petal cutter to make the job slightly quicker, but it still takes time! The trouble is, I can't cut out all the petals at once as flower paste dries out so quickly, so it's a fiddly process of rolling out the paste mega thin (I bruised my hands doing that!), cutting petals, frilling them, wrapping them round the cone, then back to rolling out more paste. Sounds a quicker process than it actually is.

This was also my first experience of stacking cakes - as it was a 3 tiered job I had to put dowels in the bottom cake to support the two above it. As the middle tier was a dummy cake I didn't have to put dowels in that, apparently. If that had been fruit cake as well then I'd have had to use dowels in that one too.

The cake itself was Delia's own rich fruit cake recipe, found here.

After hours of watching YouTube tutorials on how to ice a cake, I managed to get the icing on all three without it ripping. I even managed to ice the bottom cake and board in one go! Yay me!

The bride's reaction was apparently good, although I didn't get to see it, but I'll see her later so I'll know then. :)

All in all, a bit of a confidence booster in the end.

More on this cake, including pictures, later this weekend.

Monday, 3 September 2012

Coming soon...

I spent an hour and a half making roses out of flower paste today. 90 mins of work gave a grand total of four roses. *Sigh*

I can understand now why people charge so much for cakes. If they've handmade a whole cascade of roses, that's going to be several hours of their time! It's not just about ingredients (although flower paste is expensive and all!)

Anyway, today's rose making exercise was the start of my latest project - I've got a wedding cake to complete by the 22nd September. Actually, that wasn't the start, I've already baked the top and bottom tiers - the middle being a dummy cake, else they'll have more fruit cake than they'll know what to do with.

So this is my first attempt at a wedding cake, and I must admit I'm cacking it slightly... I need more practice at roses! I've been given pretty much free rein on the design too, with just a colour scheme to work towards, so I'm still not entirely sure how the end product is going to look.

So I will try and keep you all updated with my progress, but without giving too much away at the same time. I want to keep it as sort of a surprise. Not that I think the recipients read this, but anyway.

Wish me luck!

Wednesday, 15 August 2012

Substitutes for Rejuvenator Spirit

I've noticed a lot of people have found my blog through Googling the search term 'Rejuvenator Spirit Substitute', or something to that effect.

Well, if that's what you are looking for, I can tell you this much from what I have learnt myself.

Rejuvenator spirit is mixed with powdered colours and Superwhite to paint on fondant, rather like mixing poster paint with water.

You can also use either:

1: Vodka or another clear spirit - any alcohol would have evaporated by the time the cake is eaten and the best thing about it is that it dries really quickly without making your fondant all sticky. This can make it a hindrance though - like rejuvenator spirit itself it can start drying as soon as you have mixed it with the colour so you have to be quick!

2: Water. Yep, you can mix up your powdered colours with water to create an edible paint. This has the opposite up- and down-sides to vodka/spirits: It won't start drying as soon as you mix it with the powder, so you have more time to spend on your painting, but it can make your fondant very sticky, especially if you use too much. It also takes ages to dry.

Having done cocoa painting before now, which involves painting in different shades of brown using cocoa powder mixed with melted cocoa butter, I'm wondering if you could mix any colours with melted cocoa butter (or white fat). Hmmm. If you can, the disadvantage to that would be that it never really dries properly and could end up being smeared.

I'll have to try that one.

Sunday, 29 July 2012

Iggle Piggle Cake

So this weekend marks a year since I decorated my first cake.
In case you forgot.

I made two last year. This one was sitting on our bread board. We couldn't make any sandwiches for 3 days!


My little boy turned 2 yesterday and his favourite character at the moment is Iggle Piggle from In the Night Garden. (It was Little Charley Bear right up until about 3 weeks ago, and that was the cake I was going to do, but he changed his mind all of a sudden).

Basically it is a vanilla sponge with jam and butter cream filling, covered in fondant icing coloured green. The Iggle Piggle design is done in Royal Icing with the flooding technique.


You can't really see in the picture that the fondant was pale green, but it was. I was a little disappointed to find the morning after I made it that he had a dent in his chin, but that was the only major fault with it; except maybe that there was a split in the fondant on one of the corners - I need to practise covering cakes with fondant but it's not something I get much opportunity to have a go at. 

The cake itself is actually two cakes with one edge cut straight and then pushed together. You could still see the join after it was iced but not majorly. I need to work on that it seems.

By the time I had finished the flooding, I had to do the writing but I was shattered by that point and getting somewhat bored, so it was a little rushed and therefore not that neat, but I still think it looks OK. Honest.


Iggle Piggle and Little Charley Bear are © and TM of the BBC

Tuesday, 19 June 2012

Fishing Cake

I went to visit my great aunt and uncle in Scotland a couple of weeks ago for a long weekend - the Saturday had a party planned for the uncle's birthday, so I thought I'd take a cake up. He's very into his fly fishing, so that gave me a theme.

I even drew a design on paper first (get me!) although, as with the designs that stayed in my head, it didn't end up exactly as I expected as my drawing wasn't to scale. My plan was to have a 10 inch round cake, half land and half lake, with the fisherman standing at the edge of the water on a platform holding his rod. In the water I planned on having a swan and three cygnets, as well as a little fish at the surface of the water. Around the fisherman I wanted reeds and possibly a tree.

I didn't take any pictures of the first tree that I made (I should really remember to do that by now), but it was a disaster. I made it from white icing with the idea that I would paint it with cocoa powder afterwards to make it a nice brown colour. What a mess that made. I didn't have any white fat (as I've learnt on my course when I did the stencilling, white fat helps powdered colour stick to the icing) so I tried mixing the cocoa powder with a little water so I had something that was the consistency of melted chocolate (note to self, this doesn't taste like melted chocolate... yeuch). But I just ended up with a big sticky mess. I'd made the tree trunk and the green top of the tree in two separate sections and that was the other issue - I couldn't get them to fit together properly.

So I decided that instead of a tree I would have a stump instead, with perhaps a small creature peering out from it. But I still had the issue of not having any brown icing (I forgot to mention I didn't have any brown colouring) and being unable to paint it, so a trip to Hobbycraft ensued, where I was able to get some chocolate flavour icing and I also picked up a grass and hair piping nozzle so I could do some grass as well as reeds.

So I made my stump, and it looked lovely. As it turned out there wasn't enough room on the cake for it anyway. Sigh.

I also made up hundreds (well, it felt like hundreds) of reeds with green flower paste, and ended up only using a few, as I realised I had no way of sticking them to the surface of the cake. I put them along the side instead, and was quite pleased with the effect.

So here we are:

I was so chuffed with the cake - it came out of the oven perfectly flat!


The fishing rod was made with a piece of thick gauge flower wire with sugar paste wrapped around it. I normally like to only use edible ingredients but short of making up a batch of pastillage (which I've never done before) I didn't seem to have much choice with that one as I needed something that would be sturdy.

The grass piping tip got put to good use - that's butter cream grass there.

Little rainbow trout :-)

I was proud of my sugar paste swan.

The cygnets had slightly wonky faces, but hey ho :-)

Good job I had some spare reeds, as these didn't hold up too well during the 400 mile journey!

The fisherman fell over as well, but luckily he stood up again quite nicely, with the help of some cocktail sticks!

Thursday, 14 June 2012

A Sugar Paste Lady

So this week's lesson was about making a little model of a woman.

In one of the lessons a couple of weeks back we used moulds to make the body, head and hands so the paste had plenty of time to dry.

Creepy, huh? I took this picture after painting one of the eyes.


Then we painted details on the face with colours. Mine ended up looking a little gothic. :-)

The legs were actually a cone with sugar paste draped around it for a skirt - the body, which was on a cocktail stick, was then pushed into this, and more paste rolled out made a top. Arms were stuck on with sugar paste that had been 'let down' (no, I didn't make it a promise I couldn't keep! It's a bit like making slurry out of clay, add water until it becomes like a glue) and hands pushed into the ends of the arms.

Finally, I had my first go at using a clay gun! It was awesome and now I want to buy one. If you ever loved making things in the Play-Doh Factory as a kid, you'll love one of these:

Picture from icingonlinestore.com (I don't have a picture of one..)

The clay gun was for hair. Had a good tip from the tutor on this as well which seems obvious but I wouldn't have thought of it; don't just stick the hair to the top of the head, start from the bottom of the back and work your way up and around the sides. Gives a better finish. She was right as well.

I finished my lady off with a little hand bag made of modelling paste. Here she is:

OK, so I went a little heavy on the eye make-up. But have you any idea how fiddly it is? :-)

Wednesday, 16 May 2012

Shoes, Poppies and more

Hi all, sorry for the big gap since the last post. I'd like to say I've been really busy but, while I have been busy, I've also had plenty of opportunities to write a new post. And I haven't.

So anyway, sorry.

So I've had two more classes since I last wrote. One focused on shoes, and the other on poppies. I've also found that the longer the course goes on, the more expensive it seems to be getting, as we need to bring all our own equipment which seems to include all these things I've never even heard of, let alone own. Like flower tape, which is this strange stuff actually used by florists mostly I think (or maybe that was just the wire) but is used by cakey people too now apparently. The reason I say it is strange is because it's not sticky until you stretch it to activate the glue, and even then I can't feel any stickiness on it, but it seems to stick to itself OK, so there you go. I made the mistake in the poppy class of taking a length of tape and then cutting it from the roll and leaving it on the table to come back to when I needed it. The trouble with that is I then didn't know which was the sticky side!

But I digress; I meant to start with the shoes.

I quite enjoyed these actually. I didn't buy any shoe cutters, I borrowed the teacher's (seems so odd saying that, like I really am back at school) but I think I might go out and get some. Turns out you can also do a lot of them just with circle cutters, like these:

How cute is that?!

Little baby booties! It was just an oval for the sole, a semi circle for the back, a small circle for the front and a couple of strips for the laces, but it gives a great effect. Oh and I nearly forgot the strip around the edge of the sole to hide the join :)

We also covered flip flops, which needed proper shoe cutters:
I quite enjoyed these once I got the hang of them.

The straps are a little bit complicated, as you have to put the v-shaped bit of icing on backwards and then fold it over itself without it either breaking or coming unstuck, both of which mine kept doing plenty!

Then there were the heels:

Complete with a little clutch bag.

I struggled a bit with these as they were so fiddly, but I think I'd do better if they were bigger. Although I suppose the bigger they are, the better you have to do them as the mistakes would show more!

Everything together.

I should mention that I did all these with modelling paste. I've now found out the difference between sugar paste, modelling paste and flower paste. It is all to do with the amount of glue in the icing. Sugar paste is just your normal icing that you put over a cake, it's quite soft and pliable and tears easily. It also doesn't set very hard. Modelling paste has a little more glue in it and so sets harder and makes models stronger. Flower paste is best for flowers (obviously!) as it contains the most glue and sets really hard, so you can roll it out thinner for petals.

Flower paste came into play in this week's tutorial, which was poppies. And what a vast amount you need just for one poppy! Flower wire, flower tape, black cotton (I missed this off the list and had to borrow someone else's, d'oh!), flower paste, dusting colours and icing colours! All for one flower. And that doesn't include all the equipment either, like the rolling pin (I couldn't roll it out thin enough; flower paste is like pastry, you roll it out and it just seems to spring back into shape again), kitchen paper for the dusting colours (I forgot to bring this and all, had to borrow some from someone else), all the modelling tools, brushes, cornflour (I seem to get through a ton of this stuff. I was looking around at everyone else and they were moulding their flower paste easily with their bare hands - whenever I do that it just gets sticky and wet and I end up with paste all over my fingers like a chewing gum disaster! So lots of cornflour is required for me.)... anyway, eventually I managed to produce this:


Not bad for a first attempt, I reckon.

So there you go, this is what I've learnt.

Here's a few of the other things I've been up to recently:

More lemon cakes.

My first ever carrot cakes with cream cheese icing! I loved the carrot cakes (I've never had them before) and this recipe was from the Primrose Bakery (yes, them of the stodgy cupcakes of days past) which actually came out right this time. Soft and lovely. Shame about the icing though, I'm definitely not a fan of cream cheese icing.

Nothing like a plain old cake. I couldn't resist using the heart shaped tin though :-D

I thought I'd try a new recipe. This is spiced marmalade cake from "200 Cakes and Bakes", one of my favourite recipe books.

You've got to try rainbow cake!

This one came out a bit stodgy, but tasted good nonetheless!

Nom nom nom...


Thursday, 26 April 2012

What I done at school this week

Well, I didn't win the Easter competition, but quite frankly I didn't expect to. The other entries in the finals were amazing! But the cake was most delicious ;)


Anyway, I don't know if I've mentioned this in a previous post, but I've enrolled in a cake course at my local campus. It's a ten week course with a class every Monday evening. So far I've done two weeks - the first was just an introduction with information on what I'd need to bring and the things we'd be doing. I went for the advanced course, but apparently that and the improver's course weren't very popular (which surprised me as I thought cake decorating was really fashionable at the moment) so they have merged the two courses into one. There's still only about 6 people on it though!

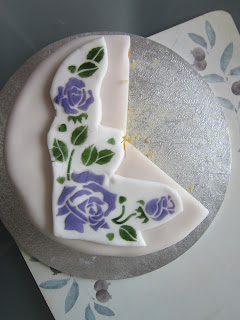
So the second class was this week, which covered how to make a lavender sprig and how to use stencils. The lavender was actually started on week one - we learnt how to make each individual flower head and that was our homework... to make 16 of them! I managed but it's fiddly work, it involves making five little rice-shaped 'petals' for each flower head - that's 96 in all! Just for one sprig! It just goes to show how people can easily justify charging hundreds of pounds for a high quality cake with sugar flowers. The amount of work that goes into it is phenomenal.
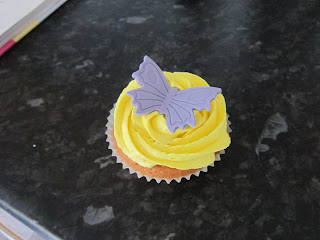
It was the first time I've ever used flower paste as well, when I made roses I stuck with fondant (also known as sugar paste) and they never really dried out properly. The flower paste has more glue in it which makes it stronger - you can roll it out thinner and it dries harder.

So here's my fully formed lavender sprig:


Not much considering it was at least 2 hours' work. But hey ho, it's given me the chance to try something new.


Then there was stencilling. I'd been instructed to buy some dusting colours for this, and also for the lavender, so the colours I bought were 'Foliage Green' and 'Lilac'. The green said it was edible, and the lilac said it wasn't edible, but only 'non-toxic'. I couldn't find any lilac that was marked as edible. I don't know if that means it's not available or what. I'm sure I'll find out.

I was really pleased with how my stencils turned out, so much so that I've bought a load off eBay today! Although the second time I tried one of them, I put it upside-down, so it got all smudged from the powder left over from the previous attempt. They also ended up a bit battered after being carried home in the box:

Together with the lavender.
The first attempt (sat on a rubbish half eaten cake.)

The smudged (and squashed) second attempt.

Quite possibly my favourite of the three.


Next week: shoes!


Friday, 13 April 2012

Easter Competition

I'm a finalist!!

http://www.facebook.com/media/set/?set=a.315602458505848.71737.115300861869343&type=1

Hopefully you can see this... if not then go to Facebook, find the Cake Masters page, like it and check out the 'Easter competition - Bake for Fun Finalists' album. My basket cake is there!

Ooh I'm all fizzy with excitement :-D

Tuesday, 10 April 2012

Easter Basket Cake

Well, Cake Masters have had another competition on for Easter. I don't think this one has a prize, but I thought I'd give it a go anyway.

Ever so original, I thought I'd have a go at an Easter basket style of cake, as there is a technique of piping butter cream where you can create a basketweave effect which I'd not had a go at before. I think you really need a special nozzle for the job but I made do with one of the plastic ones I got with my piping kit from Hobbycraft - it seemed to do the job.

I wrapped the sides of the cake with fondant icing before piping on the design, so that the sides were even. On the top is chocolate butter cream (which you can't actually see under all the decorations), many many many Creme Egg Minis (thanks Cadbury) and three chicks made from fondant. I added some flowers and leaves for a bit of colour:


The piping was very fiddly and didn't come out as neatly as I'd have liked. I think I got the icing consistency wrong as it kept curling up as it came out the nozzle. But I was pleased with the overall effect, even though I got butter cream all over the kitchen floor (it kept coming out of the top of the bag!)

I was going to add a handle, but I didn't think a fondant one would keep its shape, and I didn't want to spoil the fact that the entire thing is edible by making one from cardboard, so I just left it.

Still, not bad for a first attempt at a basket, I like to think.